ownCloud
A Quick Start Guide
This project is maintained by joelouthan
Quick Start for ownCloud Server
Introduction
This is a quick start installation guide for ownCloud Server on a single server and single database setup.
Additional installation options are covered with the ownCloud Administration Guide.
For mid-sized and enterprise scaling and high availability options, see Deployment Considerations and Deployment Recommendations.
Let’s get started.
System Requirements
Official Recommended Environment
We officially recommend and support:
| Platform | Options |
|---|---|
| Operating System | Ubuntu 18.04 LTS |
| Database | MariaDB 10+ |
| Web server | Apache 2.4 with prefork and mod_php |
| PHP Runtime | 7.3 |
Recommendation: To install in this environment, please see Recommended Standard: Ubuntu 18.04 Installation Guide.
Official Supported Environments
Server
Operating System (64bit)
- Debian 9 and 10
- Fedora 30 and 31
- Red Hat Enterprise Linux/Centos 7.5 and 8
- SUSE Linux Enterprise Server 12 with SP4 and 15
- Ubuntu 16.04 and 18.04
- openSUSE Leap 42.3 and 15
Database
- MySQL 8+ or MariaDB 10+ (Recommended)
- Oracle 11 and 12
- PostgreSQL 9 and 10
- SQLite (Not for production)
Web server
- Apache 2.4 with prefork and mod_php
PHP Runtime
- 7.1, 7.2, and 7.3
Note for Linux distributions: We support two latest plus the current Long Term Support (LTS) versions.
Hypervisors
- Hyper-V
- VMware ESX
- Xen
- KVM
Desktop Sync Client
We recommend using the latest version of the Desktop Sync Client. The latest stable client supports the platforms listed below:
- Linux
- CentOS 7.6+ & 8
- Debian 9.0 & 10
- Fedora 30 & 31 & 32
- Ubuntu 18.04 & 19.04 & 19.10 & 20.04
- openSUSE Leap 15.0 & 15.1 & 15.2
- Apple macOS X 10.10+ (64-bit only)
- Microsoft Windows 7+
Web Browser
- Edge (current version on Windows 10)
- IE11 or newer (except Compatibility Mode)
- Firefox 60 ESR+
- Chrome 66+
- Safari 10+
Mobile Apps
We recommend using the latest version of the Mobile App. The latest stable mobile apps support the platforms listed below:
- iOS 9.0+
- Android 4.4+
Tip: For more information on changes within version updates, please visit our changlogs.
Database Requirements
mySQL/MariaDB requirements:
BINLOGDisabled orBINLOG_FORMAT = MIXEDorBINLOG_FORMAT = ROWconfigured Binary Logging (See: MySQL / MariaDB with Binary Logging Enabled)- InnoDB storage engine (Note: MyISAM storage engine is not supported, see: MySQL / MariaDB storage engine)
READ COMMITEDtransaction isolation level (See: MySQL / MariaDBREAD COMMITEDtransaction isolation level)
Memory Requirements
For a single server setup:
Minimum requirement: 128GB
Recommended: 512GB
Installation
Download and Extraction
-
Visit ownCloud Download Page.
-
Click on Download ownCloud Server > Download > Archive file for server owners and download either the tar.bz2 or .zip archive.
-
Filename: owncloud-x.y.z.tar.bz2 or owncloud-x.y.z.zip (where x.y.z is the version number).
-
Download the corresponding checksum file, e.g., owncloud-x.y.z.tar.bz2.md5, or owncloud-x.y.z.tar.bz2.sha256.
-
Verify the MD5 or SHA256 sum:
md5sum -c owncloud-x.y.z.tar.bz2.md5 < owncloud-x.y.z.tar.bz2 sha256sum -c owncloud-x.y.z.tar.bz2.sha256 < owncloud-x.y.z.tar.bz2 md5sum -c owncloud-x.y.z.zip.md5 < owncloud-x.y.z.zip sha256sum -c owncloud-x.y.z.zip.sha256 < owncloud-x.y.z.zip -
To verify the PGP signature:
wget https://download.owncloud.org/community/owncloud-x.y.z.tar.bz2.asc wget https://owncloud.org/owncloud.asc gpg --import owncloud.asc gpg --verify owncloud-x.y.z.tar.bz2.asc owncloud-x.y.z.tar.bz2 -
Now you can extract the archive contents. Run the appropriate unpacking command for your archive type:
tar -xjf owncloud-x.y.z.tar.bz2 unzip owncloud-x.y.z.zip -
This will unpack to a single
ownclouddirectory. Copy the ownCloud directory to its final destination. When you are running the Apache HTTP server, install ownCloud in your Apache document root:cp -r owncloud /path/to/webserver/document-rootwhere
/path/to/webserver/document-rootis the document root of your Web server:cp -r owncloud /var/www
On other HTTP servers, it is recommended to install ownCloud outside of the document root.
Configuring Webserver
There are two ways to configure Apache.
Configure Apache
1. Create a /etc/apache2/sites-available/owncloud.conf file with the following lines:
Alias /owncloud "/var/www/owncloud/"

<Directory /var/www/owncloud/>
  Options +FollowSymlinks
  AllowOverride All

 <IfModule mod_dav.c>
  Dav off
 </IfModule>
</Directory>
2. Then create a symlink to /etc/apache2/sites-enabled:
ln -s /etc/apache2/sites-available/owncloud.conf /etc/apache2/sites-enabled/owncloud.conf
Note: For additional Apache configurations including
mod_unique_id, enabling SSL and Multi-Processing Module (MPM) considerations, please see Additional Apache Configuration.
3. Restart Apache
Configure Apache to listen on a different port
You can run ownCloud on its own port in Apache. For example: 8080.
1. In /etc/apache2/ports.conf, add the additional line right below Listen 80
Listen 8080
2. Edit the /etc/apache2/sites-available/owncloud.conf file by changing the top line to:
<VirtualHost *: 8080>
3. Restart Apache.
Before you install
Change the owncloud directory ownership to your HTTP user:
chown -R www-data:www-data /var/www/owncloud/
Note: For additional Prerequisites including Apache, PHP, or Database, please refer to: Running the Installation Wizard
Now, you have three ways to complete the installation:
Note: To install with Docker, please see Installing with Docker.
The Installation Wizard
Introduction
Recommendation: If you are planning to use the installation wizard, we recommend that you protect it by enabling password authentication or through network access control.
Web Access
- In your web browser, go to
http://localhost/owncloud - Create an admin account with your desired username and password
- Click [Finish setup]
Data Directory
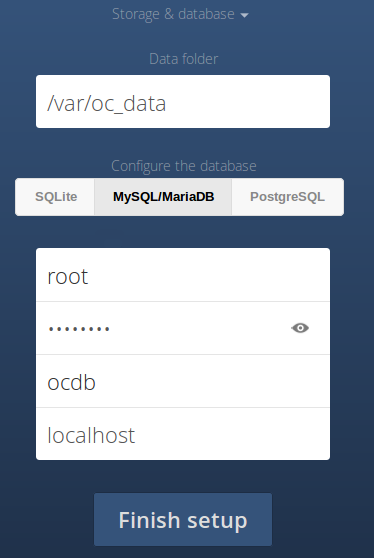
At the top drop down menu, select ‘Storage & Database’ to specify data folder and to configure the database.
Note: The directory must be already created and must be owned by the HTTP user.
Important: The data folder and content must be exclusive to ownCloud server. No other process or user can alter the directory’s contents.
mySQL/MariaDB Database
MariaDB is the ownCloud recommended database server. You can use it for either Server or Enterprise editions. To install the recommend MariaDB database server, use the following command (for Debian/Ubuntu servers):
sudo apt-get install mariadb-server
Note: will need to use a user login with permissions to create and modify databases.
- Choose “Storage & Database.”
- Enter in DB user and password
- Enter in your own database name
You can setup a temporary database administrator account with the following steps:
sudo mysql --user=root mysql
CREATE USER 'dbadmin'@'localhost' IDENTIFIED BY 'APASSWORD';
GRANT ALL PRIVILEGES ON *.* TO 'dbadmin'@'localhost' WITH GRANT OPTION;
FLUSH PRIVILEGES;
exit
For more detailed information, see MySQL/MariaDB Configuration.
For SQLite, PostgreSQL, and Oracle 11g database configuration, see Database Choices.
Post-Installation
After install, we recommend taking extra hardened security measures. See Post-Installation Guide for step-by-step instructions.
Command Line Installation
For scripted and automated operations, use command line installation.
Five steps for command line installation:
- Ensure your server meets the ownCloud prerequisites
- Download and unpack the source
- Install using the
occcommand - Set the correct owner and permissions
- Optional post-installation considerations
Let’s get started.
1. Download and unpack the source into an directory (e.g. /var/www/owncloud)
2. Change the owner for your unpacked owncloud directory with your HTTP user:
$ sudo chown -R www-data:www-data /var/www/owncloud/
3. Use occ command to perform the installation:
# Assuming you’ve unpacked the source to /var/www/owncloud/
$ cd /var/www/owncloud/
$ sudo -u www-data php occ maintenance:install \
   --database "mysql" --database-name "owncloud" \
   --database-user "root" --database-pass "password" \
   --admin-user "admin" --admin-pass "password"
Note: You must run
occas your HTTP user.
If you want to use a different data directory, supply the --data-dir switch.
When the command completes, apply the correct permissions to your ownCloud files and directories.
Important: Applying the correct permissions will protect your install.
Recommended Standard: Ubuntu 18.04
If you intend to run our recommended standard, see Install ownCloud on Ubuntu 18.04.
Administration
How do I add another user?
1. Click on ≡ the upper-left corner of the web interface and click on ‘Users’
2. At the top-middle of the page, fill in the following information:
- Username
- Email address
- Select which group
- Click on ‘Create’ button
How do I install and connect with the Desktop Synchronization Client?
1. See our Desktop Sync guide for installation instructions.
2. When prompted, fill in the following information:
- Server address:
https://<servername or ipaddress>/owncloud/ - Username
- Password
- Select ‘Sync everything from server’ or ‘Choose what to sync’
- Select Local Folder (Default:
<Home Directory>/owncloud) - Click ‘Connect’ button
How do I install and connect with a Mobile app?
Choose your guide and follow the installation and configuration directions: